Photo by Lum3n from Pexels

Design and Code – Part 2 – Designing Auto120 ‘On Paper’

This is the second in a series of blog posts I’ve been working on during COVID isolation. It started with the idea of refreshing my systems design and software engineering skills, and grew in the making of it.

Part 1 describes ‘the problem’. A mathematics game designed to help children understand factors and limits which represents the board game Ludo.

In Part 2 I take you through the concepts of translating the rules and sequence of decisions made by the game into a visual model, and the implications for this when it came to converting it from a mental to an algorithmic model.

Get in touch on Twitter at @mr_al if you’d like to chat.


Beige Analog Compass by 
Ylanite Koppens via Pexels

Before Hitting the Keys

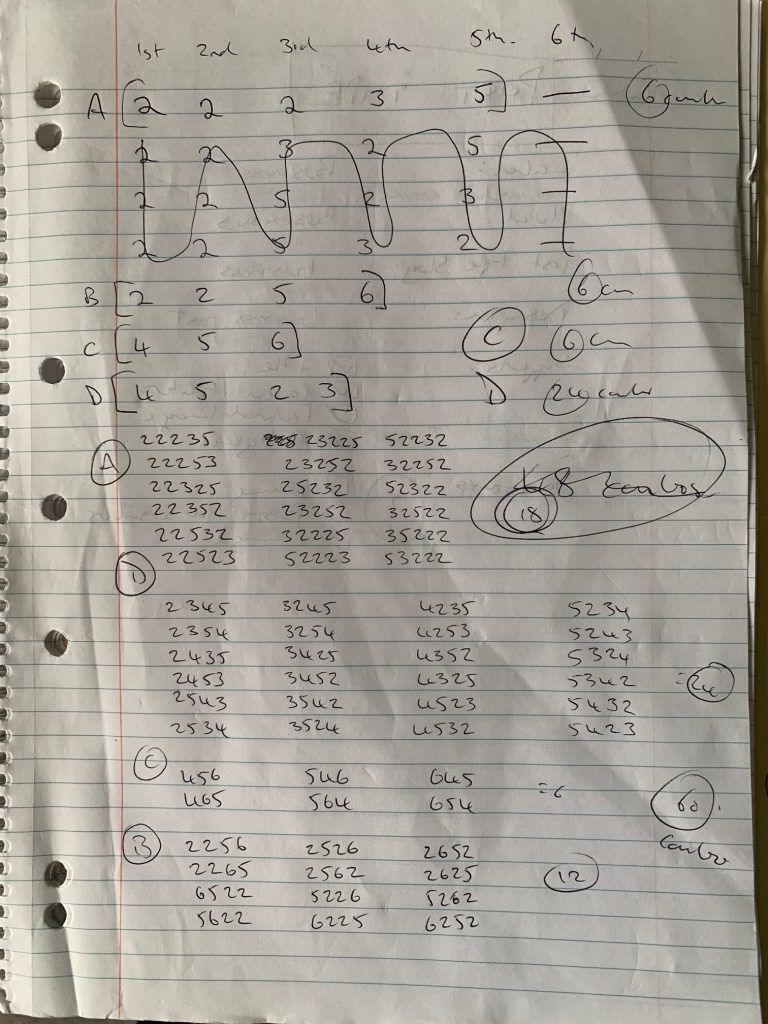
I’d spent a bit of time reflecting on this problem. Having played a couple of games with Miss 11 at home, I sat down one night with a pencil and paper to work through the Marker journeys, and to identify what the key number patterns were. 

Figure 1 – Ascertaining the factors and penultimate numbers possible when rolling a die with a valid number range of 2 to 6, so that the destination product is 120. [Also, plot of a arc segment produced by a partial glass of bourbon.]
Figure 2 – Manually testing the combinations of die rolls resulting in a Marker landed perfectly on position 120. Each of these number sets when represented as integers progressively multiplied will total 120.
Figure 3 – The ‘playing board’ represented in an Excel spreadsheet, colour coded to identify the ‘paths’ of play, what is ‘off path’ (i.e. will never return to a point where the Marker can hit 120), primes (which will never be ‘hit’), ‘factors’ (which are likely to be landed on along the way) and ‘penultimates’ (which are the final Positions that a Marker can rest on before reaching 120 in (hopefully) their next move.

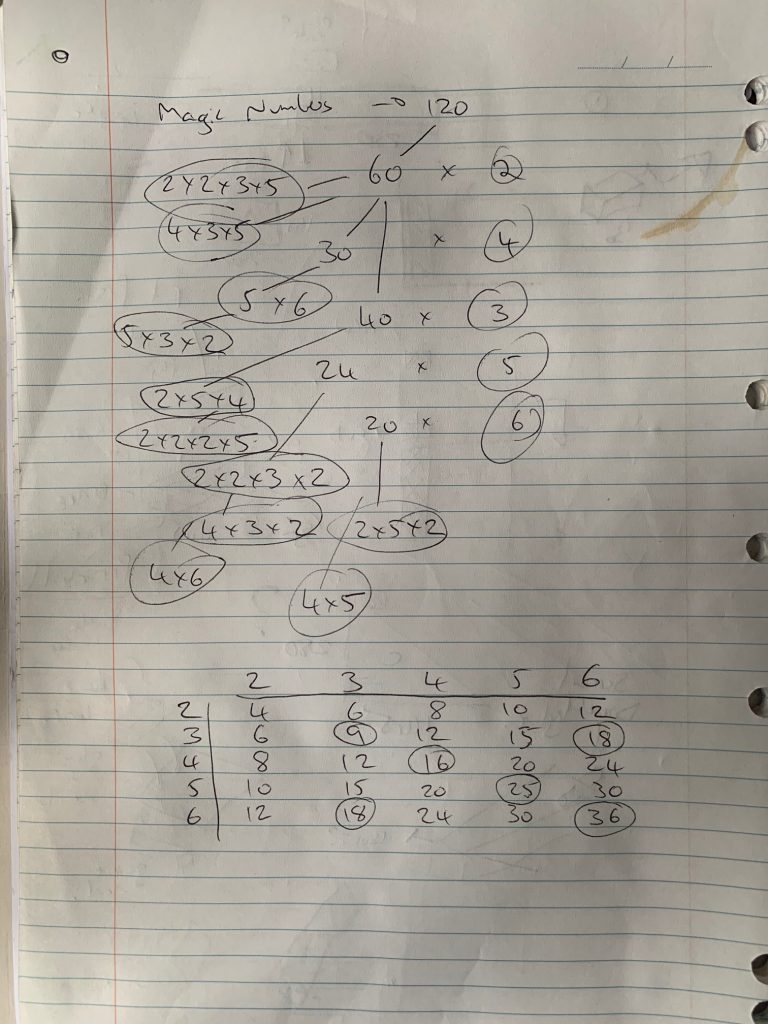
The table at the bottom is a neater representation of the result of where pieces will land, based on their current ‘position’ and the roll of the die.

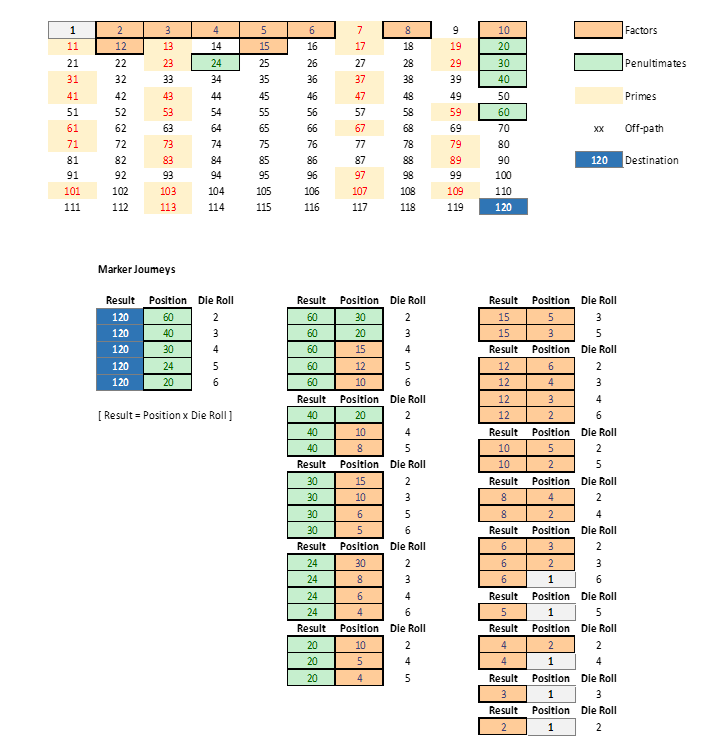
The tables (and scribbles) above show this. The grid at the top of Figure 3 is the “playing board”. There are a finite number of Marker Positions that a ‘successful’ Marker will occupy as it traverses the board towards the destination of 120 (dark blue). There are also a known number of prime-number locations (above a value of 6, in red) that will never be landed on.

Accounting for the fact that a die roll of 1 results in a forfeited move, this means there are five ‘penultimate’ positions (light green) and nine ‘factor’ positions (orange) which represent the ‘well-worn path’ of successful Markers. If a Marker strays from the path – then they are doomed. They cannot re-join the successful path and will eventually be bumped or busted back to Position 1.

Why is this important? Because it gives the algorithm a fighting chance, rather than randomly picking pieces and hoping for the best.

The FASTEST possible journey is for a Marker to be moved resulting from any sequential roll consisting of one each of 4, 5 and 6 (moving it to position 4, 20 and 120 respectively… or a combination thereof). Of all the Markers available to move, the algorithm will look to prioritise one that is on the ‘fast track’ of factor and penultimate numbers.

Without this targeting, the game board may as well be hidden from view, with the Players each rolling their die and then calling out a blind guess as to what Marker to move. Maybe they’ll “count cards” and keep an image in their mind as to what Markers are where… but that is not the spirit in which the game was designed ?

Once the ideal Marker journeys had been identified, then came designing the functionality to have the algorithm make a choice based on the available evidence. This matured in the coding of it, and in the realisation that additional conditions – as captured in the description above – needed to be applied. Even a relatively simple game such as this one – used to teach primary school children mathematics basics – had logical layers like an onion.

Moving from Modelling to Design

I started with the design for the most basic Scenario Set – D. Moving a piece from ‘out of play’ to ‘in play’. This was relatively straight forward… until I realised that on the opening gambit that a Player may land on the Opposing Player’s Marker on only the second move of the game. (i.e. both rolled a ‘4’ on their first move… there is nowhere else they could go.)

So, the ‘detect clash’ became the next function designed. To do this, I needed a way of holding instances of both Player’s Markers so I could cycle through them and see if any were a hit. The first challenge to that was realising that there was an exception to the ‘occupy the same space’ rule. All Player’s Markers start at Position 1, and it is to that Position they return when bumped or busted. So, it had to ignore Markers on Position 1, and Markers that were ‘inactive’, having passed precisely through Position 120 on the way.

Battleships

The targeting of Opposition Player’s pieces in Scenario Set C came next. This was a variation on the logic used to detect clashes. Except, this time, it had to do some forecast calculations and then decide which piece to move. It was during the design for this method that I realised that I would not necessarily want to move a Marker ‘off the path’ or away from the fast-track, just to take out an Opponent. This was a lose-the-battle/win-the-war scenario. The logic behind choosing which Markers to target was tricky, and cost me most of my time in debugging, swearing and bourbon. I got there, eventually.

Priority Treatment

Design of the methods to target penultimate and factor Positions took a positive turn when I realised that the same logic could be applied to two different number sets. I wanted to give priority to the (green) penultimate numbers, so they became one set, and the factor numbers (orange) became the second. I applied them in that order. If a penultimate target was found, it was used. If not, the same searching logic was applied to factor numbers. I collectively referred to these as ‘magic numbers’, hence the naming in the code.

Are we there, yet?

Final trick was figuring out if it was game over. The original property design for Markers had a flag to indicate if it was active or not. I realised half way through coding that this was redundant, as was the property indicating who the owner was. Object orientation came to the rescue.

Basically – the owner was determined because the Marker was instantiated by a Player, and we would never reference a Marker without referencing the Player first. The second aspect was inelegant, but effective – once a Marker hit 120 exactly, the logic built around it would ignore any further moves involving it. The status flag was changed to a method – if you query this Marker and it’s Position is 120, it’s INACTIVE. Therefore… if you scan all a Player’s four markers and they each return INACTIVE… it’s game over.

Lovely. Time to start detailed design!

NEXT POST… Implementation design, class and method structure.

Photo by Lum3n from Pexels

Design and Code – Part 1 – Introduction to ‘Auto120’

This is the first in a long series of blog posts I’ve been working on during COVID isolation. It started with the idea of refreshing my systems design and software engineering skills, and grew in the making of it.

I’m hoping this will interest and inspire others who are either starting out with their interest in design and coding, or who are curious to explore and learn more beyond what they currently understand.

So, here is Part 1. Get in touch on Twitter at @mr_al if you’d like to chat.

Photo by Lum3n from Pexels

Auto120 – Description of problem

I decided to explore an algorithmic implementation of the “Multiplication Ludo” game as published by Dr. James Russo of Monash University, Australia.

Russo, James. (2018). Get your game on: Multiplication Ludo. (Prime Number: Volume 33, Number 3, 2018. The Mathematical Association of Victoria)

https://www.researchgate.net/publication/326571291_Get_your_game_on_Multiplication_Ludo

The original algorithm and rules derived from Dr. Russo’s description. Interpretation and rules sequencing by Alistair Lloyd (me!) May-June 2020. My awareness of this was through publication by Mr. Michael Minas, editor of Prime Number and award winning educator.

Set up:

• Two Players face a board with Positions marked from 1 to 120 inclusive

• Each Player has four Markers

• Every Marker starts at position 1

• The first Player to move all 4 of their Markers to land exactly on Position 120 is the winner

Game Play:

• A Player is chosen at random to go first

• Players take turns rolling a six-sided die

• If a Player roles a 1, they forfeit their turn

• If a Player roles a number between 2 and 6 inclusive, they can move one of their Markers

• The movement is calculated as the PRODUCT of [i] the die roll, and [ii] the value of the Position of the Marker that the Player choses to move

• (i.e. if the Player rolls a 5, and choses to move Marker 1 on Position 1, then they may move this Marker to Position 5 (5 x 1 = 5)

• (i.e. if the Player rolls a 4, and choses to move Marker 3 on Position 16, then they move this Marker to Position 64 (4 x 16 = 64)

• If the destination Position is already occupied by one or more of the Opposing Player’s Markers, then all the Opposing Player’s Markers at that Position get ‘bumped’ back to Position 1. Those Markers must start again from Position 1.

• A Player may have more than one of their own Pieces sharing the same Position.

• If the destination of a Player’s chosen Marker EXCEEDS the value of 120 then that Player’s Marker is bumped back to Position 1 and must start again.

• If a Player’s Marker lands exactly on position 120, then that Marker has concluded its journey, and is retired from the game. The Player continues with their remaining Markers.

• The game continues alternating Players until one Player has successfully landed ALL four of their Markers on Position 120.

Design – Algorithm

The algorithm in the code does the following decisions in this order:

Setup

Between Player 1 and Player 2, a starting player is chosen at random.

Scenario Set A – Prioritise advancing on ‘penultimate’ Positions

When a Player rolls a die, the algorithm first looks ahead to see if there is an opportunity to move a Marker to any ‘penultimate’ Positions. Penultimate Positions are those in the number set {20,24,30,40,60} where a single subsequent die roll (respectively: 6,5,4,3,2) will result in the Player landing that Marker exactly at Position 120. If it finds more than one Marker that can target a penultimate Position, it will pick one at random and move it.

Scenario Set B – Prioritise advancing on ‘factor’ Positions

If not, the algorithm goes looking ahead to target a ‘factor number’ which is one of the numbers in the set which, when cumulatively combined with die roles of 2 to 6, could eventually lead to Position 120. (i.e. one possible Marker journey is: 2, 4, 20, 40, 120 based on die rolls of: 2, 2, 5, 2 and 3). In doing this, it increases the likelihood of a Marker fast-tracking it to the end state.

Scenario Set C – Prioritise targeting Opposition Markers

If not, it goes looking to “target” an Opposition Player’s Marker to bump back to Position 1, by applying the product of the die roll value to all active opposition Markers to see which ones it may knock out. (i.e. if Player 1 rolls a 5 and could move a Marker to Position 10, then it goes looking to see if Player 2 has any Markers on Position 10 that it could bump.). The algorithm will pick the first potential target that meets these criteria.

Scenario Set D – Choose a Marker at random

Finally, if it has fallen through these three scenarios conditions, then it will do a coin toss and either:

i) pick a Marker at random which is in play (i.e. on a position > 1) to move, first checking if there is a risk that the Marker could ‘blow out’ by exceeding 120 when applying the die roll value, or

ii) pick a Marker at random that is not yet in play (i.e. on position 1) to move into play.

If all active Markers could potential blow out, then it choses one at random anyway as it must make a move.

End-game Check

After each Marker move, it scans the status of the four Markers for each Player. If a Player has no more Markers in play, they are identified as the winner and the game ends.

NEXT POST… Part 2 – designing the algorithm ‘on paper’ to work through the logic in preparation for turning it into an implementable model for object-orientated coding…